Lulzbot v Makerbot
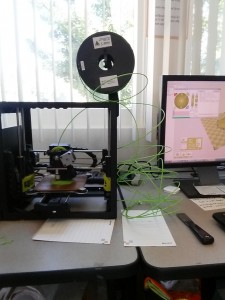
We’ve had a Makerbot Replicator all year as our 3D printer. It’s taken me quite a while to get the hang of it and to really understand it’s eccentricities and temperament. On the whole I compare it to Apple devices, which are very shiny and pretty for the consumer but restrict you from making any modifications or from tinkering with its inner workings. When our school had some technology money to spend, we decided to expand our printing capabilities by getting two new printers- the Lulzbot Mini.
We opted to go with two minis rather than one large one so that we could have more prints running simultaneously and churn out more small student projects. While individual users might prefer the larger one to make larger prints, having the one Makerbot seems sufficient for our large jobs and the small things can be delegated out to the smaller printers.
How do the new ones compare? They are different and in learning the differences I have somewhat been favoring the original Makerbot where I know the tweaks necessary to make something print well. We’ve done several prints head to head to compare and there are indeed advantages both ways.
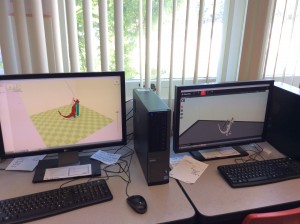
1. Print software- Both Makerbot and Lulzbot have their own rendering software for processing the designs for printing. Lulzbot is much easier to manipulate than the Makerbot. On Makerbot when you change size as a percent, it calculates off of the previous size rather than the original (60% of 50% rather than resetting and taking 60% of the original). Lulzbot is much easier to set the exact temperature because you are forced to do so each time. However, you can only have one Lulzbot window open at a time which means you can’t have a queue of prints waiting. In Makerbot I will have 4 windows open at a time, each with the settings for that specific print so that I can just start the next project when the previous one finishes. Advantage: Tie
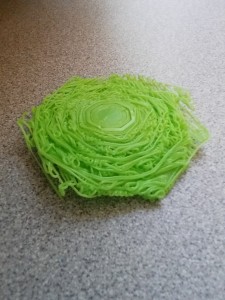
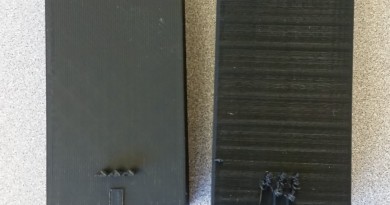
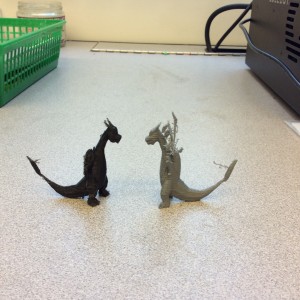
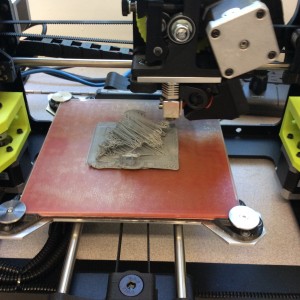
2. Supports- Both programs will automatically calculate and add supports if you select that the design needs supports. However, Lulzbot is much less thorough with supports and often does not include all the supports that Makerbot does. In fact, Lulzbot will decide to completely ignore parts of the design if it is too thin or would need too many supports. In the dragon example above, the Lulzbot (black) didn’t even bother printing the dragon’s wings. The green cabbage thing above is the underside of a octagonal bowl that didn’t have supports. Also, most likely due to the type of plastic, the Lulzbot supports that do get printed are much more difficult to break off than the Makerbot ones, which leads to many more broken prints. I would often print something on Lulzbot, have it fail, and then reprint it on the Makerbot in order to get a decent print. Advantage: Makerbot
3. Torque- This is an area that I hadn’t considered until talking to another teacher with a 3D printer at home. The Makerbot is a massive printer with a print head that moves in both the X and Y directions. The Lulzbot print head only moves in the X direction while the platform itself moves in the Y direction. This works well for the most part but does end up putting a lot more torque on the print and leads to many more prints breaking off of the platform during a print job. Spheres and eggs are hard for both printers but Lulzbot is the worst, even with supports. Advantage: Makerbot
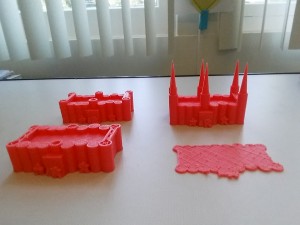
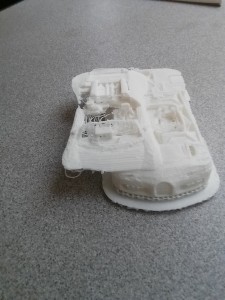
4. Filament management- Something I had to learn the hard way. When the Makerbot runs out of filament, it stops and tells you about it so I expected the Lulzbot to do the same. But no, the Lulzbot will continue to print happily without any filament at all. This means that when you do discover it printing in mid-air, there’s no way to set it to start at the tier it left off at and means you must redo the whole print. The castle above was printed 4 times because of filament errors and poor design rendering (the Lulzbot software thought the cones on top were floating).
Part of the reason I had so much trouble with the filament was because I was switching rolls and the filament got itself into a knot. This can happen with both printers but was much more dramatic with the Lulzbot. Overall I prefer having the alert when there’s a printer error rather than going along and heating up nothing. Advantage: Makerbot
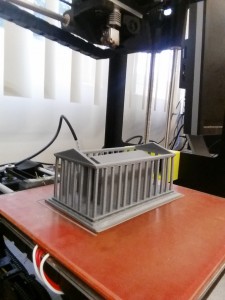
5. Printing simple designs- For the straightforward design with fully supported parts, the Lulzbot is a better quality printer. On the basic settings (not best), the print is much smoother and the plastic cools much harder. These Greek structures came out quite well because the base was wide enough to prevent it from tipping over and there were no large spans of roof. The Makerbot tends to leave fibers between regions so all of the columns would have been webbed together. In order for a print to work well on the Lulzbot, it needs to be low, broad, and simple, needing little or no supports. In my planned STEM instruction next year, I hope to get all the elementary students printing projects and will teach them how to design things that will actually print. This year many of the students found extremely complicated designs online and then were disappointed when their biplane or Lamborghini didn’t come out smoothly. The Lulzbot is good at printing certain types of designs. The Makerbot is fine at printing the rest. Advantage: Lulzbot
6. Troubleshooting- With both printers, the pseudo-quest was to see what I could do in normal operations to break or jam it. The Makerbot succeeded at this right away and we had a lot of trouble for a few months with the extruder getting jammed. This was eventually resolved by purchasing the new and improved extruder, which was indeed in high demand from everyone else in the world dealing with the same jamming problems. We also have the problem that the Makerbot doesn’t always reset to (0, 0) when honing in the beginning. This can mean that the print won’t be centered which will be a problem for large print. It also may mean that a disruption mid-print will end up causing some surprising errors.
Learning what to look for and troubleshoot in the Makerbot took me a few months to figure out but I’d say I now feel confident dealing with its errors. The Lulzbot is still new to me although I was indeed able to jam it. I like the Lulzbot’s open design and the ability to reprint any pieces that break. Overall we’ve had many fewer problems with the Lulzbot so I’d say that gives it the overall advantage over the Makerbot.
Both are good printers but do indeed need some breaking in time and a lot of trial and error before you are comfortable with their ins and outs. I’m looking forward to doing more serious training of the students on the 3D printers and hope to start training students to do the troubleshooting as well.